
Today, I am so excited to share the next chapter in my “Keeping Christmas Alive” series, where I have been breathing new life into some beloved vintage Christmas tree tablecloth fabrics month by month. Back in September, we kicked the autumn season off by transforming wooden thread spools into darling little fabric Christmas trees. Now, as the air turns crisp, I actually have a festive double feature for you: my October project, plus an early look at November’s craft!
If you would like to see these finished pieces up close and follow along with me in the craft room, you can watch the full video tutorial right here: Fran’s Easy Fabric Christmas Crackers & Wendy’s Easy Festive Soup Bowl Holders.
Celebrating Community Talent: A Special Thank You to Wendy
Before we dive into the cutting and stitching, I want to talk about something very close to my heart: local crafting talent. One of my absolute favourite parts of exhibiting at the Vancouver Island Exhibition (VIEX) was connecting with fellow makers and admiring the incredible skill right here in our community.
During the exhibition, I had the pleasure of presenting some of the gorgeous knitting and sewing work created by a wonderfully talented local lady named Wendy. Specifically, I fell head over heels in love with her handcrafted fabric soup bowl holders! They were so charming and practical that I knew right away I wanted to try making a few of my own for my Christmas tablescape using my festive tablecloth materials.
In complete honesty, my bowls turned out a little bit bigger than Wendy’s, and I still think she did a much nicer job on hers than I did on mine! To figure out the construction for my own use, I spent some time browsing Facebook and YouTube to see how different makers approached the patterns, and then adapted a method that worked for my stash.
Thank you so much for the inspiration, Wendy! Because there are so many gifted makers around us, I am excited to share that I will soon be adding a dedicated Community Talents section to the Fran’s Friends website, adding more wonderful local creators to the list as we go along.
October’s Project: Wendy’s Inspired Festive Soup Bowl Holders (or Candy Dishes!)
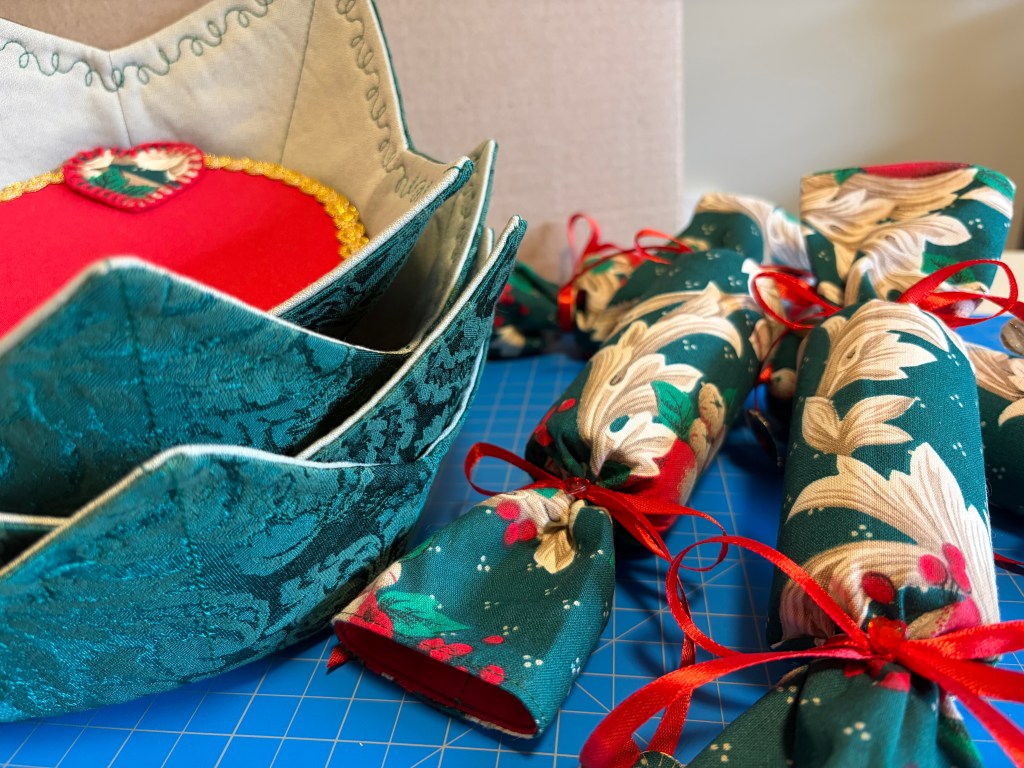
For my soup bowl holders, I paired my signature Christmas tree tablecloth material (which I have used as a lining across many of my projects this year) with a lovely, festive green fabric that has been patiently waiting in my stash for many, many years.
Now, I realised as I was making these that not too many people actually serve hot soup with Christmas dinner! However, these cosy fabric bowls make the most wonderful holiday candy dishes or festive bread baskets for the centre of the table.
How I Made Them:
The pattern is wonderfully simple and gratifying to put together. I have included the full pattern handout alongside the video, but here is how the magic happens:
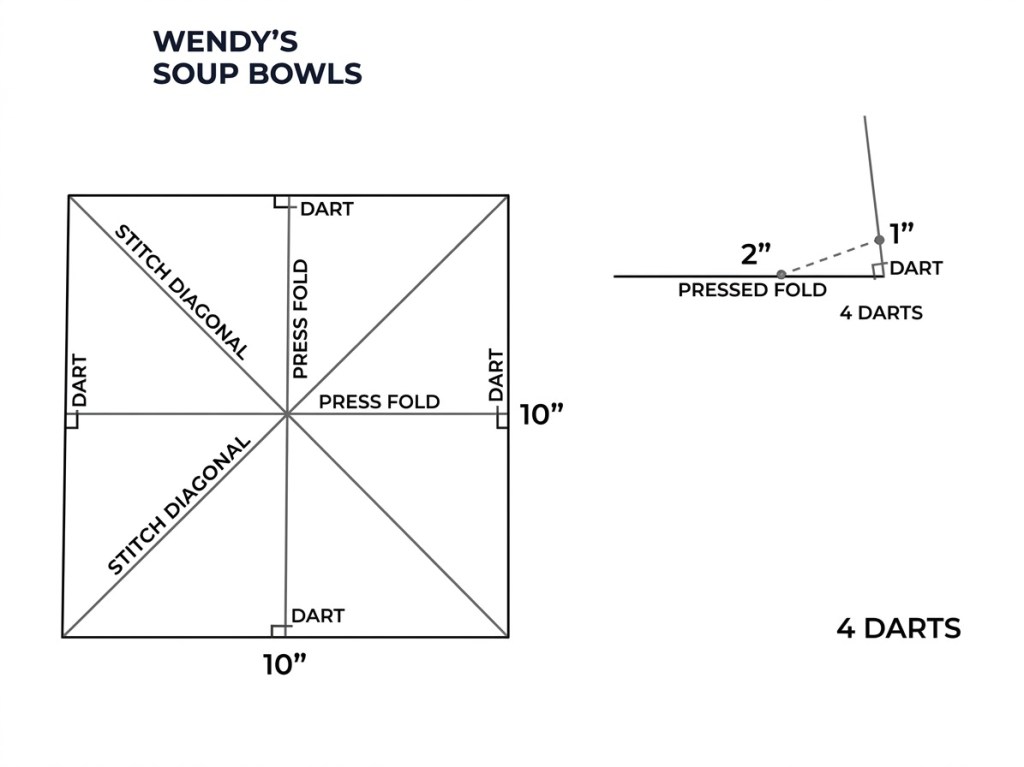
- Cut & Quilt the Base: I started with two 10″ x 10″ squares of fabric (one outer fabric and one lining fabric). To keep the layers together and give the bowl some structure, I sewed a simple diagonal line from corner to corner on both sides, creating an ‘X’ across the square.
- Fold & Press: Next, I folded the fabric square in half and gave it a good press with the iron so my creases were nice and sharp.
- Create the Darts: Darts are what give the flat square its lovely three-dimensional bowl shape. Along the folded sides, I measured 2 inches in toward the centre, and 1 inch up the side, stitching a diagonal line between those points to form a dart on each of the four sides. You will do this for both your main piece and your lining piece.
- Shape the Corners (Optional!): I experimented with two different styles here! I made four traditional bowls keeping the pointed corners, and two bowls where I rounded the corners before sewing them together. Both look lovely on a holiday table.
- Assemble & Turn: Place your two darted bowl pieces with the right sides together, stitch around the perimeter (leaving a small gap for turning), turn the bowl right-side out, and press the edges neatly.
Fran’s Crafting Fix: The Yo-Yo Insert & Festive Hearts
In the spirit of honest crafting, when I first finished turning my bowl, I wasn’t overly happy with how the bottom sat—it had a little bit of “bubbly” bunching in the centre where the seams met. Rather than unpicking the whole thing, I came up with a sweet little solution!
I gathered a circle of matching fabric—just like a traditional fabric yo-yo pattern—flattened it out into a neat disc, and slipped it right inside the base of the bowl. It covers the centre seams completely and adds a lovely tailored look! To finish them off and make them extra merry, I stitched little decorative fabric hearts onto each of the four sides.
Getting Ahead for November: Reusable Fabric Christmas Crackers
I know I am getting a little bit ahead of myself, but I made the decision to tackle November’s project early! I am not quite sure how much I will be able to accomplish in November, and I want to make sure I can take things at a gentle pace so I am back to my usual self by December to wrap up our year-long Christmas theme.
For November, we are making Reusable Fabric Christmas Crackers!
I have always loved pulling Christmas crackers around the dinner table, but when you go to the store to buy a box of decent ones (not the flimsy ones!), you are easily looking at spending $20 or more. Worse yet, the moment they are pulled, all of that paper wrapping goes straight into the rubbish bin. Over the years, I have started making my own out of fabric. They look so much more special on the table, they save you $20 every single year, and best of all, you are recycling and keeping waste out of the landfill!
How to Make Your Own Fabric Crackers:
Just like the bowls, I am sharing the full pattern and dimensions with the video so you can easily recreate these at home.
- Save Your Cardboard Rolls: Instead of flimsy toilet roll tubes, I like to use the really sturdy cardboard inner rolls from wrapping paper or kitchen foil cut down to size for my inserts. They hold their shape year after year!
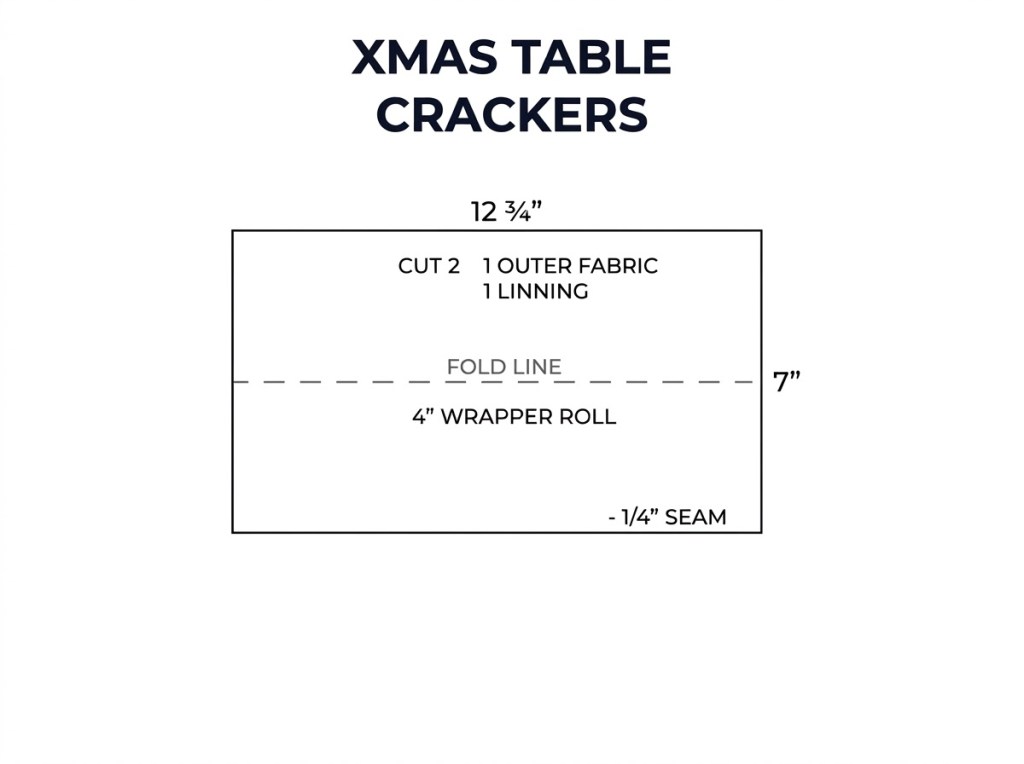
- Cut Your Fabric: For each cracker, cut a rectangle of your main fabric and a piece of lining fabric measuring 12 ¾ inches long by 7 inches deep. Adding the lining gives the cracker a much weightier, more finished look when it sits on the plate.
- Sew the Tube: With right sides together, sew your outer fabric and lining together, fold the piece in half lengthwise, and stitch down that 7-inch back seam to form a fabric cylinder.
- The Clever Reusable Trick: Slip your sturdy cardboard roll right into the centre of your fabric tube. Now, here is my favourite secret for making these effortless to reuse:
On the bottom end: Gather the fabric tightly just past the edge of the cardboard tube using heavy-duty upholstery thread, tying it off permanently and finishing it with a decorative festive ribbon.
On the top end: Instead of tying it permanently with thread, gather the fabric using a small elastic band and tie your decorative ribbon right over top of the elastic!
When Christmas dinner is over, your guests simply slip the ribbon and elastic off one end to get their treats and paper crowns inside. Then, you can pack the crackers away with your holiday decorations, refill them next December, pop the elastic back on, and your table is dressed and ready to go!
Until Next Time…
It brings me so much joy to see how far that single Christmas tree tablecloth has stretched this year, tying our September spool trees, October candy bowls, and November crackers together into one big, heartwarming holiday collection.
Don’t forget to grab the pattern details accompanying the video if you’d like to stitch along with me, and keep an eye on the website for our upcoming Community Talents page!
I hope you enjoyed today’s projects. Keep those needles moving, carry on with your crafting, and I shall be back with you very shortly for December’s finale!
Thanks again for watching and reading—bye for now!




Leave a Reply