As many of you know, I’ve decided to dedicate this year to transforming my home, starting with my downstairs guest room. I’ve gone all-in on a nautical theme, filling the space with sea-inspired creatures like turtles, seahorses, and fish. My latest addition is a quirky, oversized snail that I am just thrilled to share with you.
The Vision: A Nautical Sanctuary
The goal for my guest room is to create a serene, ocean-side retreat. While the bedding is a crisp, clean white, I’m using these handmade sea creatures to provide pops of color. I’ve focused on a palette of deep blues, vibrant greens, and soft aquas. This snail isn’t just a toy; it’s a focal piece of home decor designed to sit alongside my other aquatic friends and tie the whole room together.
Fabrics with a History
One of my favorite things about this project is the mix of materials I used. Many of them have a story!
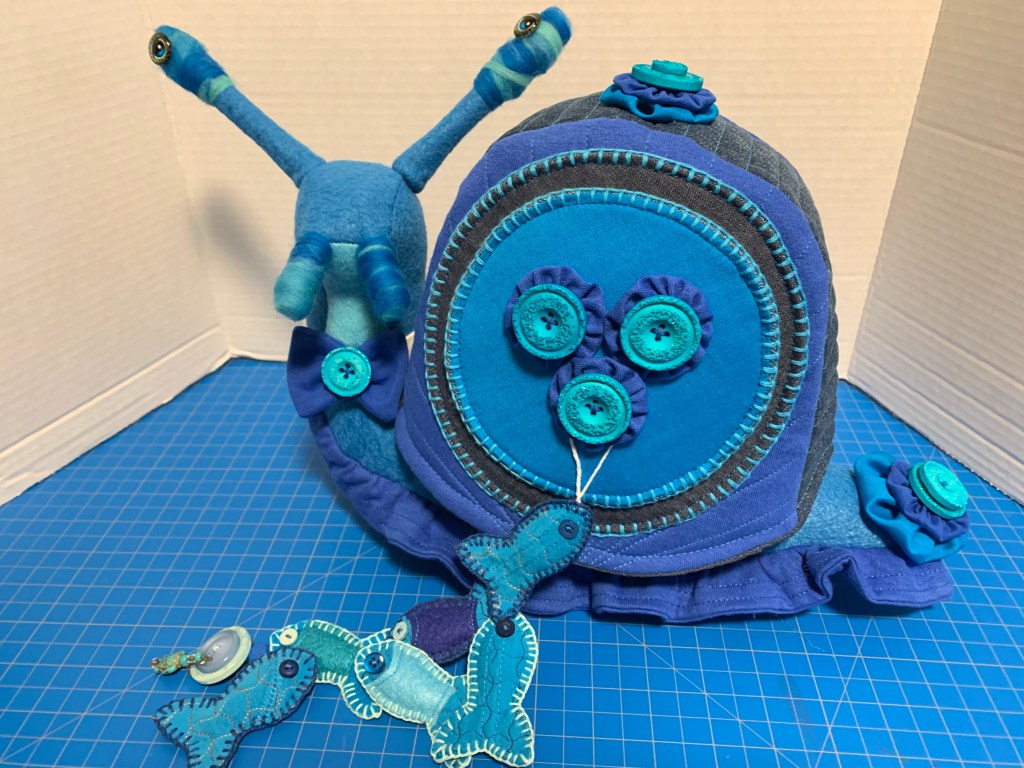
- A Taste of Tahiti: I used fabric from a sun wrap I bought in Tahiti years and years ago. It features beautiful porpoises and sea life patterns that perfectly match the room’s vibe.
- Repurposed Classics: I love upcycling, so I incorporated denim from an old pair of jeans and soft t-shirt fabric. (A pro-tip: always stabilize your t-shirt fabric before sewing!)
- The Details: I used felt for the base and ruffles made from the hem of a t-shirt to add a bit of whimsical texture.
Building the Shell and Body
The construction of this snail is quite unique. Instead of one solid piece, the shell is designed almost like a tea cozy! It fits snugly over the snail’s body, which means you can actually see the structure underneath if you lift it off.
- Texture: To give the shell that classic spiral look, I used my machine to stitch lines every three-quarters of an inch. I used a heat-erasable pen to mark my lines first so I could be sure they were perfect before sewing.
- Yo-yos: I added oversized, stuffed yo-yos to create a three-dimensional effect that really makes the shell stand out.
Creative Problem Solving: The Appendages
The pattern originally called for epoxy sculpt for the snail’s “horns” or appendages, but I wanted something a bit softer and more textile-based.
- Structure: I used wooden dowels with rounded end caps for the base. For the head attachment, I used a nut-and-bolt joint effect to give it a sturdy, professional feel.
- Color & Softness: I wrapped the dowels in roving wool in shades of green and blue, intertwining the colors to give them depth. I’m even considering a light acrylic spray to help them keep their shape and firm texture over time.
The Finishing Touches
While the snail is mostly complete, I’m not quite done yet! I plan to use alcohol markers or pastels to add some fine detailing and shading to the fabric, which will give it even more character. I also added a little bow tie made from t-shirt scraps and used simple buttons and beads for the eyes to pull the look together.
What’s Next?
Working on this pattern taught me so much about technical skills and going “beyond the pale” with my craft. Stay tuned, because I’m planning a series of short tutorials on the specific techniques I used here—including how to get perfectly crisp, steamed seams that make your handmade decor look professional.
I haven’t named my new friend yet, but they are already looking right at home in the guest room. Thank you for joining me on this creative journey!


Leave a comment