Hey there, crafting dog lovers! Fran here, and let me tell you, I’ve been on a super sweet and sentimental crafting adventure that I just have to share with you all. It all started with a little trip down memory lane, rummaging through a cupboard. And what did I find? An old coat that my amazing mom had knitted for my beloved dachshund puppy back in the day for Christmas. You know how it is with sentimental things, you just can’t bear to part with them!
From Cozy Coat to Dapper Dachshund: A Crafty Transformation!
I looked at that little knitted coat, and it just sparked an idea! I thought, “Fran, you’ve got a dachshund pattern! Why not breathe new life into this precious knit and create something truly special?” So, that’s exactly what I set out to do.
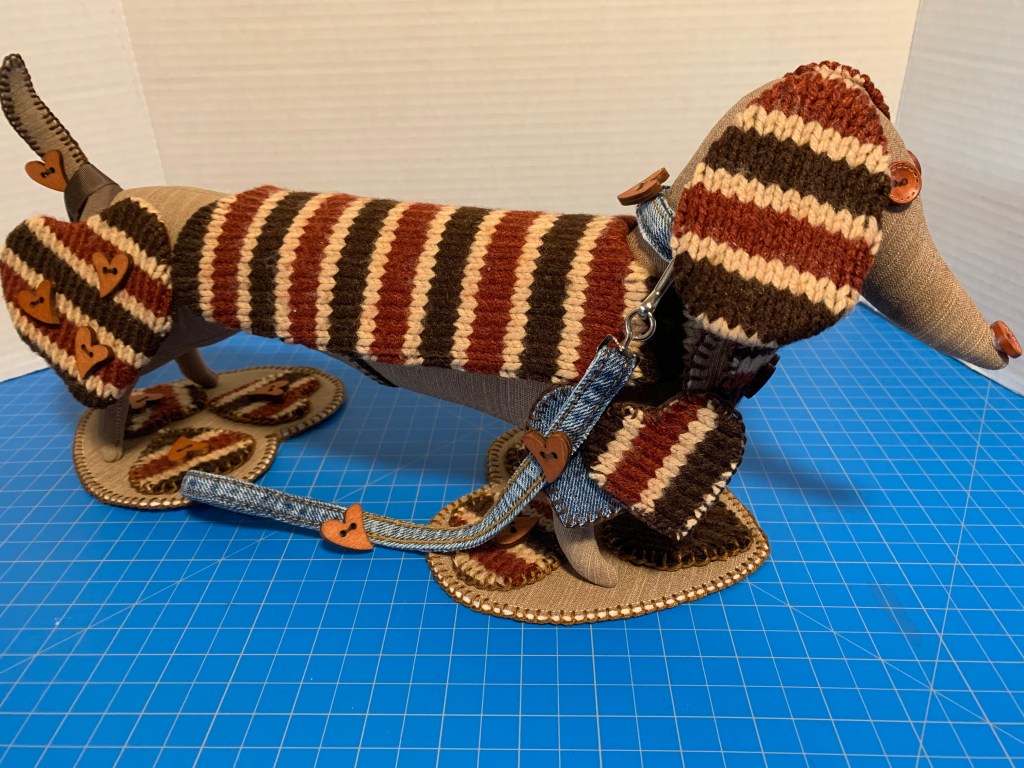
I pulled out a pattern called “Tilda Dapper Dachshunds.” If you’re into crafting, you might know Tilda patterns – they’re usually super cute and often available as free downloads.. This one was no exception, and thankfully, it was a pretty simple pattern. We’re talking only four pieces for the dog’s body, a small tail, and an underbelly piece. Perfect for a quick and fun project!
The Nitty-Gritty: Making the Magic Happen
Now, for the slightly tricky part – cutting into that beloved knitted wool! I was a bit nervous about it fraying, so I used a genius little trick: adhesive interfacing. I ironed it onto the wool first, then did a test cut, and voilà! It worked like a charm. It gave me a nice, clean edge, with just a tiny bit of fraying, which was totally manageable. For extra stability, especially around the edges, I opted to blanket stitch the pieces together, effectively creating a brand new coat for my stuffed dachshund.
For the main body of the dog, I used some upholstery fabric in a lovely tan brown. My little dogs have always been those beautiful tan shades, so it felt right. And using that thicker, woolly interfacing gave the dog a lot more structure, helping him stand up proudly.
Those Adorable Details!
Now, for the fun bits! I made the ears from the actual sweater knit and then backed them with the brown body fabric. For the eyes and nose, I used some adorable little wooden buttons that I threaded on. The overall effect is just too cute!
I also made sure the knitted coat went all the way around the front, and on it, I added a little heart. I even blanket-stitched a small woolen heart right on top of that – because you can never have too much love, right?
The tail was a bit of a challenge – it took me three tries! First, the wool was too small to turn. Then the body fabric didn’t quite work. But eventually, I figured it out: two pieces, blanket-stitched around the edge, which gave it this lovely shape and allowed it to twist a bit.
Special Memories: Zek and Zeke!
And because every project tells a story, I wanted to include a very special touch. My son had once drawn a picture of our second doxie, Zek (the first one was Zeke). It was from his first birthday, and it’s just so precious. I printed that picture, used some heat-n-bond to secure it between two pieces of fabric, and then framed it in a little metal circle frame. I even added a little string, and now it hangs proudly on my new stuffed companion. It’s such a lovely way to remember my sweet pups!
On the very bottom, where my stitching wasn’t quite perfect (hey, we all have those moments!), I just added another little blanket-stitched heart to cover it up. Easy fix!
Overall, I’m absolutely thrilled with how my dapper dachshund turned out. He’s a little bit of my mom’s knit treasure, a little bit of my crafty spirit, and a whole lot of cuteness. He’s going to fit right in with all my other treasured memorabilia.
I hope you enjoyed this little peek into my crafting world! Happy crafting, everyone!


Leave a comment