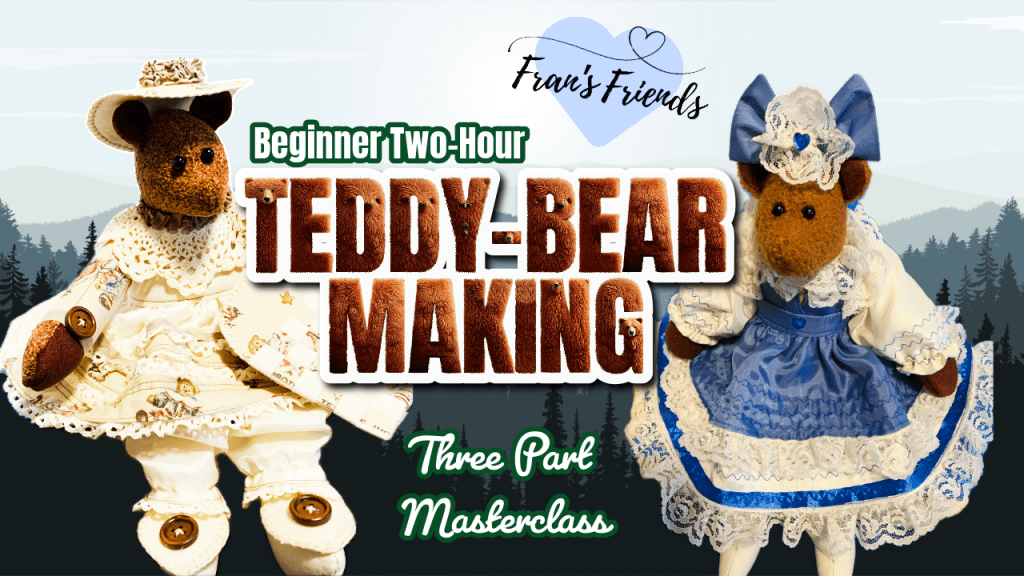
My Journey into Teddy Bear Making: Part 1 – Bear Preparation
Hey everyone! I’m so excited to share my latest crafting adventure with you all. This month, I’m dedicating my time to the wonderful world of teddy bear making, and I’m kicking things off with a beginner-friendly, two-hour teddy bear project. This first part is all about the preparation, getting our materials ready, and understanding the patterns.
The Inspiration: “Two-Hour Teddy Bears” Book
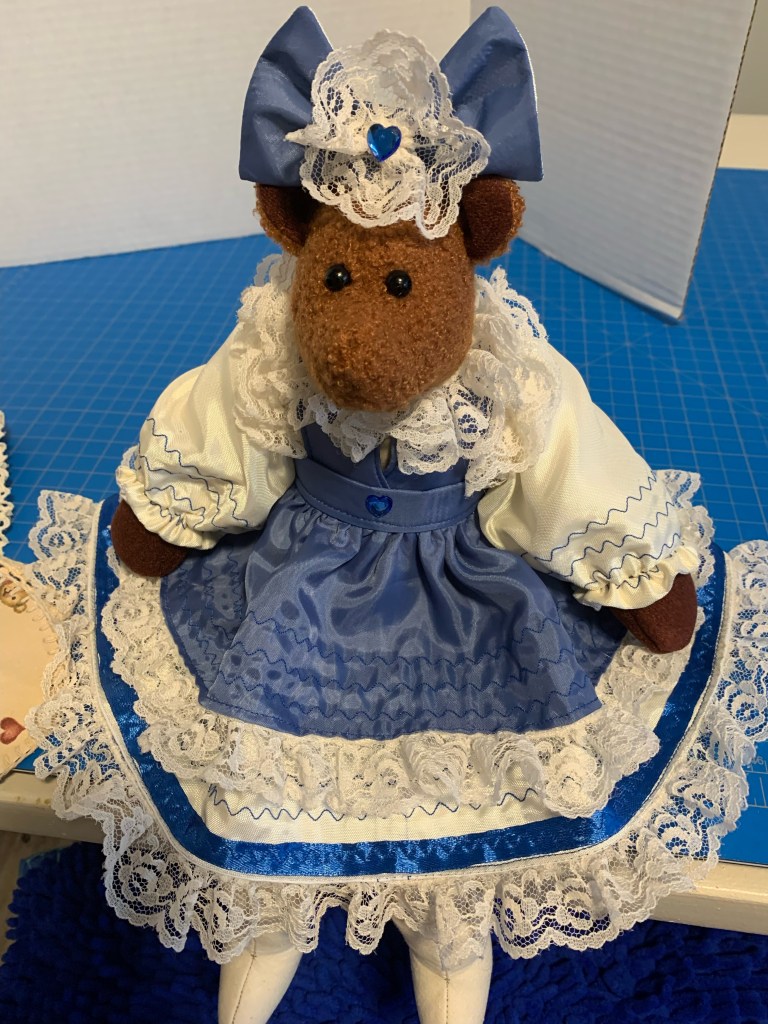
My main guide for this project is a book called “Two-Hour Teddy Bears” by Anita Louise Crane. It’s an older book, published in 1998, so I’m not sure if it’s still widely available. However, the techniques are timeless, and I’m going to be making two bears from it that will end up looking completely different!
Finding Your Pattern
For those of you who might not have this specific book, don’t worry! You can easily find free teddy bear patterns online. Just type “free teddy bear patterns” into YouTube or Facebook, and you’ll find a whole bunch of options. I’m even going to try and post the pattern pieces I use once I’ve traced and cut them out, so keep an eye out for that!

Getting Started with Colette
The first bear I’m making is named Colette. She’s a very simple design, primarily made from fabric. Her body piece is a basic circular shape, and her head will be made from a woolly material. I’m also going to give her feet using a light canvas material, as I plan to put shoes on her. The arms will also be made from the light canvas, with fur for the paws.
Fabric Choices and Stabilization
For Colette’s head, ears, and paws, I’m using an upholstery fabric. It’s a lovely color with a nice texture and thickness. A crucial step for any fabric in teddy bear making is stabilization. I’ve used a medium-weight, adhesive cotton interfacing on the back of this fabric to give it stability.
For the body piece, I’m using a very light canvas material. This fabric is quite cost-effective, and I buy it in bulk. I’ll also be stabilizing the back of this fabric to ensure the body is nice and firm.
Tracing and Transferring Patterns
To transfer the patterns from the book, I use parchment paper. It’s transparent, making it easy to trace the pattern pieces. Once traced, I cut them out and then transfer them onto hard cardstock for durability. This method is great for any patterns you find, even if you have to trace them directly from a computer screen!
Looking Ahead: Embellishments and Future Projects
While this part focuses on preparation, I’m already thinking about the embellishments. I’ll be using lots of pre-gathered ribbon lace for easy application. For the dress, I’m using a cute teddy bear print cotton fabric. I’m also experimenting with a new technique for the second bear’s dress, using a scarf from the 70s to create a circular skirt or dress by folding and cutting the fabric.
One last tip: always keep your fabric scraps! Even the smallest bits can be useful for things like ears or paws, especially if you’re working with limited quantities of a specific fabric.
So, that’s it for Part 1: Bear Preparation! I’m really excited about this project, and I hope you’ll join me as we move on to Part 2: Bear Building. Stay tuned!
My Teddy Bear Making Journey: Part 2 – Bear Building
Welcome back to my teddy bear making adventure! In this second part of my “Beginner Two-Hour Teddy Bear Making” series, I’m diving into the exciting world of bear building. If you missed the first part, where I covered preparation, be sure to check it out! I also have a “Bear Making Basics” video with my top 10 tips that you might find helpful.
The Pattern Pieces
For this project, I’m using a pattern from a book called “Two-Hour Teddy Bears”, specifically the “Colette” bear. I traced the pattern onto parchment paper and then transferred it to hard stock or card stock for durability. This particular bear is designed to be simple, requiring only four basic pieces:
- The Head: This is a simple, basic head pattern with a “V” shape for darts. These darts help give the head its roundness. You sew along the edges and down to the neck, then gather the bottom with upholstery thread for strength. I also added eyes by forcing them in with a doll needle and pulling the thread through the back. Remember to pack the head really well!
- The Arms: For the arms, I used basic canvas since they’ll be covered. I used a soft, velour-like material for the hands. After stuffing them firmly, I used a blanket stitch to close the opening so they could be attached to the body.
- The Body: The body is also made from basic canvas. You’ll need two pieces, a front and a back, and then you sew along the two edges. The dashed line indicates the waist, where you can attach a dress or skirt. I gathered the top with a gathering stitch and tied it tightly, then stuffed it. The pattern suggests doing the same for the bottom, but I found that didn’t allow the bear to stand well. So, I inserted one of my joint pieces into the bottom and gathered it tightly, creating a nice, solid base.
- The Feet: You don’t have to add feet if you don’t want to, but I did. Always make sure to cut the foot pattern in reverse so they face the correct direction.
- The Ears: The very last piece is a small template for cutting out the ears. I used one fabric for the outside of the ear and a different one for the inside. You don’t stuff the ears; instead, you just turn the edges under.
My Learning Curve: A Complicated Twist
While the concept of this two-hour teddy bear is supposed to be simple, I encountered a bit of a challenge. I made a significant error with the arms: I stuffed them too firmly. This made them stiff and difficult to position, throwing the entire bear’s proportions out of whack. Ideally, I should have either loosely packed them for movability or not packed them at all, leaving them flat so they could be easily bent and positioned.
Because of this, the head now appears a bit small in comparison. To compensate, I’m working on a decorative hat to give her face more emphasis. This mistake has definitely made my “two-hour” project take much longer than anticipated, but it’s all part of the learning process!
Moving Forward
Despite the unexpected complications, I’m still excited to put this bear together. I’ll be sewing the head onto the body using upholstery thread. I’ll also need to figure out how to extend the legs a bit more to balance the proportions.
For the body, I glued the two canvas pieces together with extensions to create little “knickers”. I’ll add a round piece of felt to cover the bottom for a more finished look. I’ve also made a little dress for her, and in Part 3 of this series, I’ll delve more into dressing and embellishments.
It’s true that crafting isn’t always the easiest, and sometimes you learn the most from your mistakes. Thanks for watching and for listening to my trials and tribulations in bear making!
My Journey into Teddy Bear Making: Part 3 – The Finishing Touches!
Hey everyone! I’m so excited to share the final part of my “Beginner Two-Hour Teddy Bear Making” series. This video, titled “Part 3: Finishing Touches”, is all about bringing our teddy bears to life with some adorable details.
A Quick Recap of Parts 1 & 2
Before diving into the finishing touches, let’s quickly revisit what we covered in the previous parts:
- Part 1: Preparation – We started by selecting our pattern and materials. I showed you how to cut out all the pieces and even began to envision the design of our bear. This project uses a basic bear technique with no jointing, only some stitching with upholstery thread, and simple placement for the eyes and ears. The bear is made from only four pieces: the head, arms, body, and feet, plus the ears. The ears, by the way, are always the trickiest part to sew! The material used is mostly canvas, making it a very cost-efficient project.
- Part 2: Bear Building – In this segment, we assembled all the different pieces of the bear. I demonstrated how to put together the foot, arms, head, and body. The head has a distinct shape, and the body is a basic piece.
Part 3: The Grand Finale – Finishing Touches!
Now for the fun part – adding personality to our bears! This is where we give our basic bear format some real character.
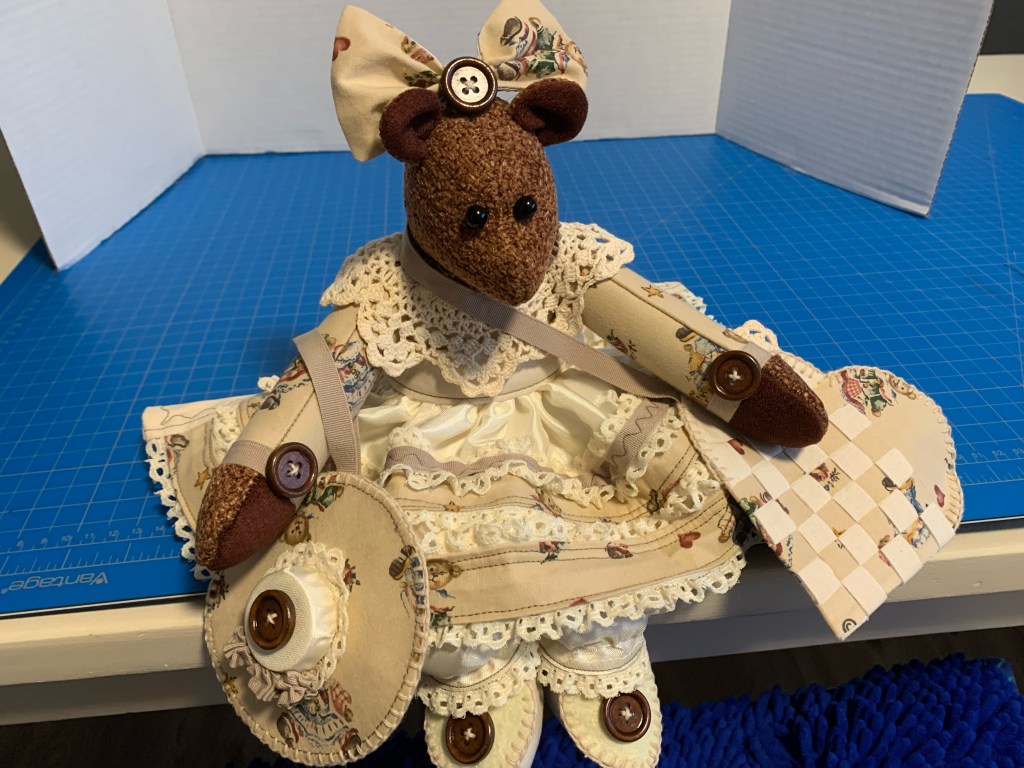
Meet My Little Bear! I’m so pleased with how my little bear turned out. She has such a lovely face!
- The Dress: I put a beautiful dress on her. The skirt features a gathered, ruffled effect, and I cleverly used her actual body as the top of the dress.
- Neckpiece: For a charming touch, I added a crocheted doily as a neckpiece, with a little ruffle around her neck.
- Arms and Paws: Her arms are made from the teddy bear fabric, and I added a small band on her wrist with a decorative button. The fabric of the head extends to the paws, and I used a velour material for the inside of the paws.
- Ears: Her little ears are quite cute.
- The Bonnet: I gave her a lovely little bonnet. It’s made from a round disc of the teddy bear fabric with a piece of felt and heat-n-bond. I cut them out and then stitched all the way around with a blanket stitch. For the headpiece, I used my husband’s medicine cap as a base, adding some ribbon and little bubbly flowers made from ribbon, tied together with a button.
- Legs and Shoes: I extended her legs because I wasn’t happy with the original proportions. I then put on leggings with a little gather around the foot. For shoes, I added two small hearts with accompanying buttons to tie everything together. She sits perfectly with her little legs dangling over the edge.
- Back Detail: At the back, I put a little heart where the dress connects, just to cover it. The canvas at the back of her skirt folds under when she sits.
Eyes and Nose: She has the cutest little face, and her eyes are really adorable. I haven’t put the nose on yet, as I’m still deciding on the best way to do it. I plan to do both noses together and will create a separate tutorial on how to do noses and eyes in July.
The Oversized Purse: I also made her a little oversized purse. It’s a heart-shaped purse, and as you can see, the inside is beautifully finished with a weaving technique. This is the same technique I used for my Christmas ornament in my advent calendar, but in reds and whites. I thought it would be cute to make one in the teddy bear fabric and canvas. I’m still deciding whether to add a handle or if it will just sit tucked under her arm.
I’m very pleased with how this two-hour bear project turned out, even though it took a bit longer than two hours due to some issues. It really shows how a simple pattern can go a long way.
This project was inspired by the book “The Two-Hour Teddy Bear” by Anita Louise Crane.


Leave a comment